| SkullandBonesSkateboards.com Forum Index » SCREEN PRINTING » Home Made Exposure Unit? |
|
Page 1 of 2 Goto page 1, 2 Next |
|
| Author |
Message |
| ivescreenedforless |
 Posted: Tue Dec 09, 2008 6:42 pm Posted: Tue Dec 09, 2008 6:42 pm |
 |
|
 Joined: 30 Sep 2007
Posts: 150
Joined: 30 Sep 2007
Posts: 150
|
I currently use (rarely) one of those small halogen shop lights for exposing screens at home. It sucks balls so I normally expose my screens at work, but I would like to be more productive at home.
I was thinking of buying a 1000watt Metal Halide lamp, like the ones people use for growing "things" indoors. I wonder if I really need 1000watts though. I'm hoping to achieve 2-3 minute exposures. Do you think a 400watt or maybe even less would do the job? I found some for a good price too.
I will build a rig similar to the industrial units minus the whole vaccum deal.
Thanks in advance |
|
|
| Back to top |
 
|
|
|
| masonmayhem |
| Posted: Wed Dec 10, 2008 1:20 pm |
|
|
|
Joined: 28 Oct 2004
Posts: 1376
Location: Redneck Riviera, AB
|
i would think even 200 watts might be enough.
i have one of those industrial ones (with vacuum power!) and it uses ten 20watt black lights. my exposure time is at 3min 15sec.
i think if you had 1000 watts your burn time would be a few seconds.
i've never built an exposure unit, so i'm just going on what i've learnt with the one i have. |
_________________
...if it ain't insane then you can't get rad... |
|
| Back to top |

|
| ivescreenedforless |
| Posted: Wed Dec 10, 2008 1:38 pm |
|
|
|
Joined: 30 Sep 2007
Posts: 150
|
One of my bosses has one for sale that he built. 1500watt halogen, and 2 black light bulbs on the side. Said he build it based off the "Atlas 3 way" unit, vaccum and all.
300 bucks...not bad at all. |
|
|
| Back to top |
|
|
|
| mkelty |
| Posted: Wed Dec 10, 2008 2:26 pm |
|
|
ORDER OF THE SKULL

Joined: 06 Oct 2006
Posts: 3644
Location: Springfield, OR
|
Just a quick suggestion, did you look to see if your workshop light has UV filtered glass over the bulb? Most do, and if you take it off, it actually works like a charm.
Just a $300 dollar saving thought....  |
|
|
| Back to top |
|
| ivescreenedforless |
| Posted: Wed Dec 10, 2008 2:55 pm |
|
|
|
Joined: 30 Sep 2007
Posts: 150
|
Thanks for the tip, I dont think it does though cuz it came with my shitty press.

#1 came cracked
#2 is not that long and doesnt have the stoppers on the ends
anywho.. a "professional" unit cost like $1500+ so I think $300 is pretty good. Ive seen some prints he did with this unit, halftones and all. |
|
|
| Back to top |
|
| Fool's Gold |
| Posted: Fri Jan 02, 2009 2:18 pm |
|
|
|
Joined: 10 Mar 2005
Posts: 284
Location: Ontario Canada
|
| The vacuum is probably the most important part of the unit. If you can rig up a home made vacuum blanket then do it . (it's simple, just make a frame, but weather stripping around it, put a rubber roofing gasket over the frame, attach a shopvac and you have a vacuum) When I switched from a home made unit, to a large format vacuum frame (with the same bulbs by the way) I could get much much more detail out of every screen. I could also almost double the exposure time and get the same results, with a stencil that reclaimed and printed better. Went from 55 up to 65 LPI on the same screens with only the addition of vacuum pressure. vacuum = king. |
_________________
IRONCLAD GRAPHICS: Custom screen printed posters, apparel and stickers. |
|
| Back to top |

|
|
|
| ribuckethead |
| Posted: Tue Jan 06, 2009 9:34 am |
|
|
 Joined: 29 Oct 2008
Posts: 56
Location: The Bucket, RI
Joined: 29 Oct 2008
Posts: 56
Location: The Bucket, RI
|
Fool's Gold wrote: just make a frame, but weather stripping around it, put a rubber roofing gasket over the frame, attach a shopvac and you have a vacuum
this sounds like a sweet setup. I'm having a hard time picturing it though. Just how do you attach the shop vac to get the suction? Any pics? thx! |
|
|
| Back to top |
|
| Fool's Gold |
| Posted: Tue Jan 06, 2009 4:13 pm |
|
|
|
Joined: 10 Mar 2005
Posts: 284
Location: Ontario Canada
|
Two options.
1) cut a hole in the neoprene blanket and get some sort of industrial fixture to attach a plastic hose to. Then make sure the blanket is sealed with something like ShoeGoo or a wetsuit repair kit. Attach the hoses to your shop vac. This is similar to my vertical vacuum frame.
2) drill holes through the actual frame and attach the hoses that way. Might be a bit easier.
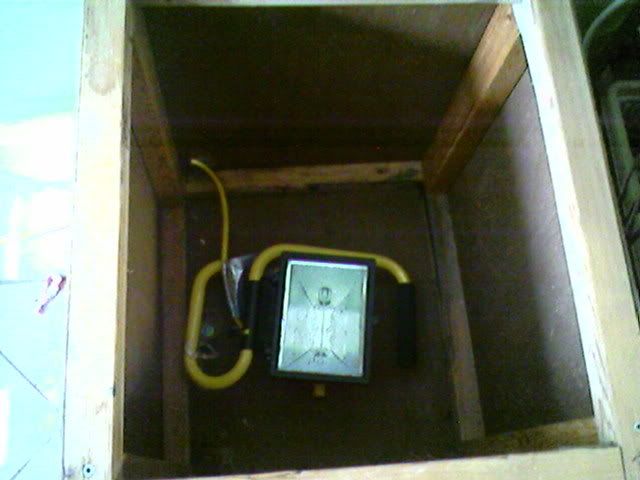
One thing I would recommend is to get an extra few lengths of small hose (like real small, the thickness of a pen) and use those to make a channel from where the vacuum pulls from, to the screen frame. Sort of like how you see the cords in this picture.
[img]http://farm4.static.flickr.com/3040/3027493801_0fd74e82f8.jpg?v=0[/img] |
_________________
IRONCLAD GRAPHICS: Custom screen printed posters, apparel and stickers. |
|
| Back to top |
|
| dartheyeball |
| Posted: Tue Feb 03, 2009 11:51 pm |
|
|
|
Joined: 06 Jan 2005
Posts: 16
|
i made my own exposure unit. works fantastic

 [/img] [/img] |
|
|
| Back to top |
|
|
|
| dartheyeball |
| Posted: Tue Feb 03, 2009 11:54 pm |
|
|
|
Joined: 06 Jan 2005
Posts: 16
|
here's a pic of 1 shirt i've done with that exposure unit
 |
|
|
| Back to top |
|
|